Reading Understanding Git
Many people learn Git commands without ever understanding how Git works.
This has two huge drawbacks:
- they can't use Git beyond basic commands—hence missing out on most of Git's power,
- they get stuck whenever something unexpected happens.
Here, I try to explain how Git works. It may sound complicated, but it is really worth your time to read through this and try to understand as much as possible. As we practice together later today, things will make more and more sense. At the end of the workshop, this is a lesson that you might want to revisit, with your new Git understanding.
There are two main parts to this lesson:
- In Project history, I give an overview of what a project history looks like.
- In the How does Git work? section, I try to explain the actual functioning of Git.
Project history
One of the main goals of Git is to record the history of a project. Let's start with the big picture and see what a project history is.
Git saves the history of a project as a series of snapshots
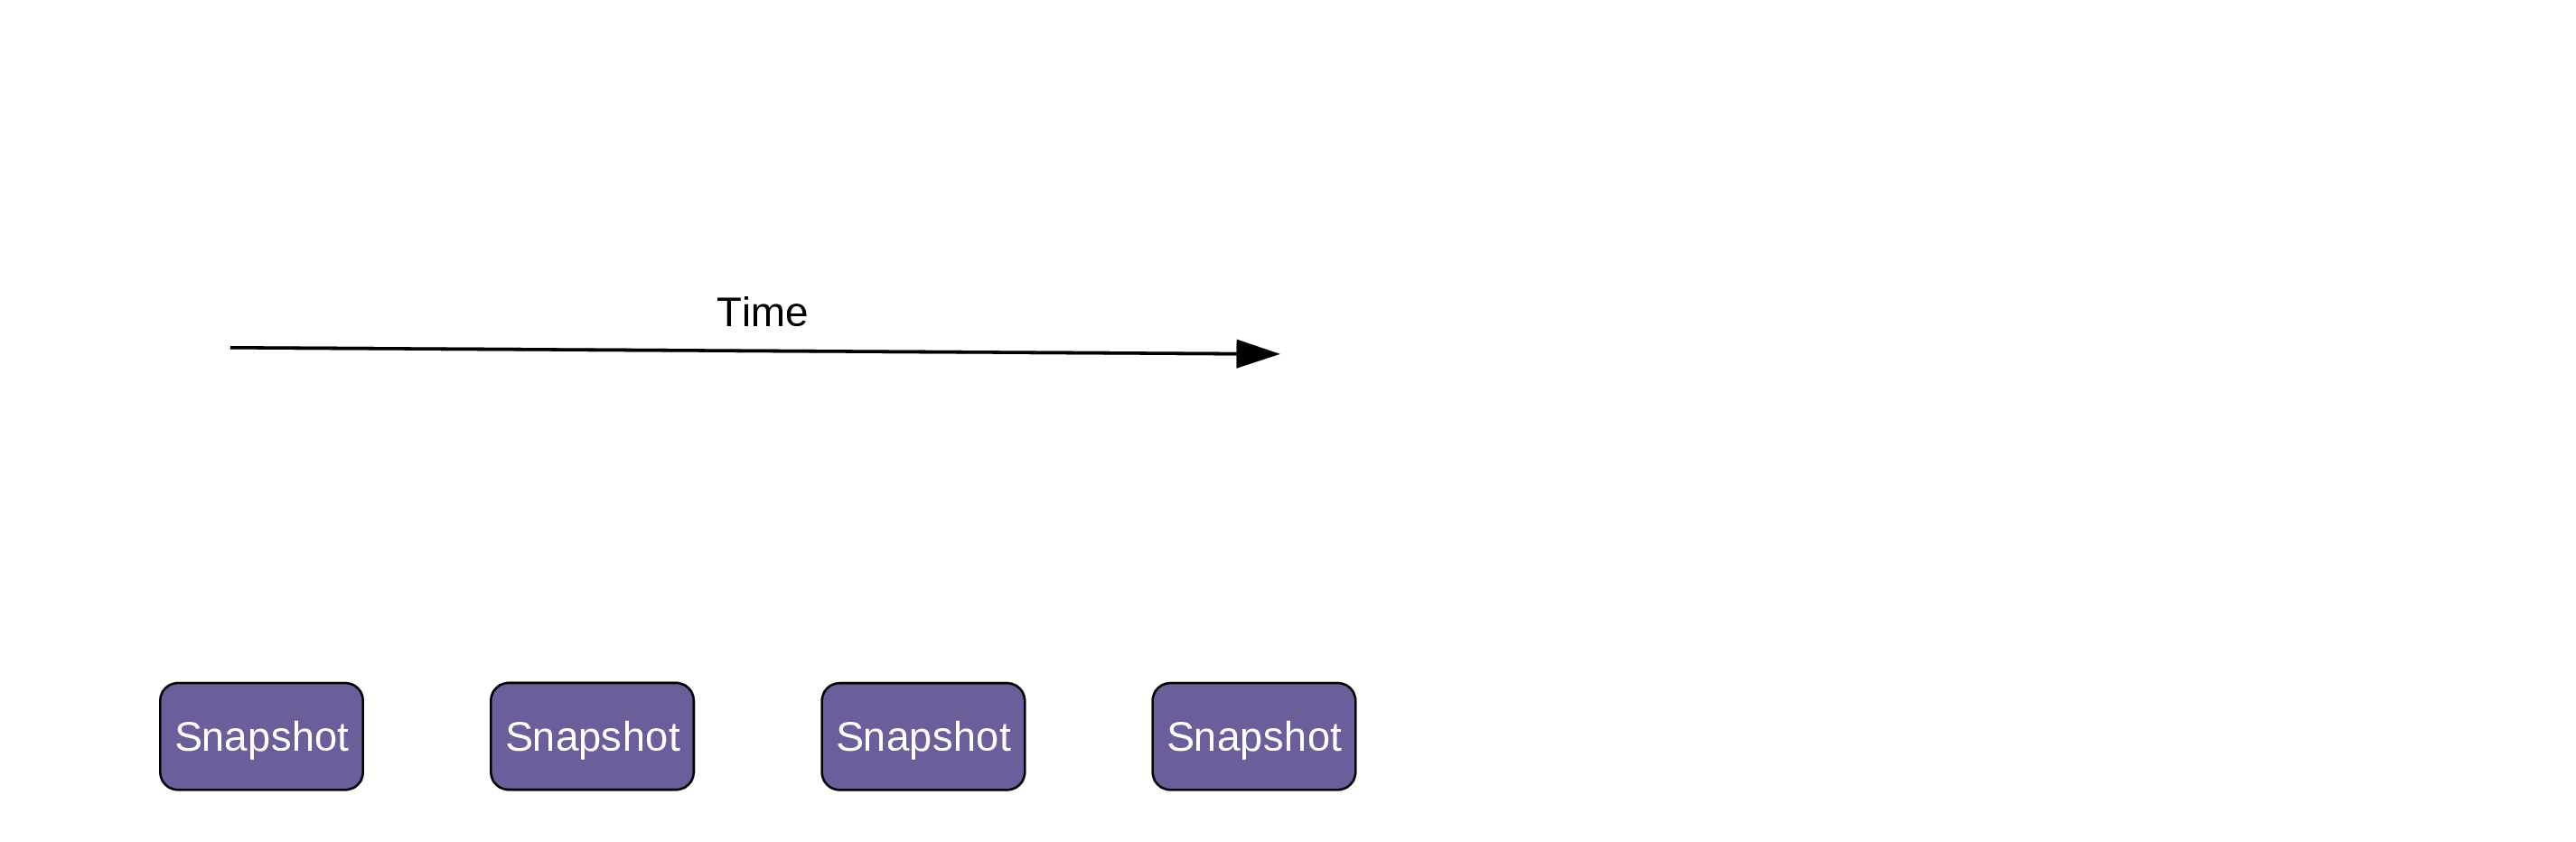
What is a snapshot?
A Stack Overflow user had this sentence about Git snapshots:
Snapshot is to a repository as screenshot is to a video.
It is a good metaphor: if you think of the entire life of your project, a snapshot is a record of its state at a moment in time. It is a version of the project.
This version is archived in a compressed form in a special .git directory inside your project.
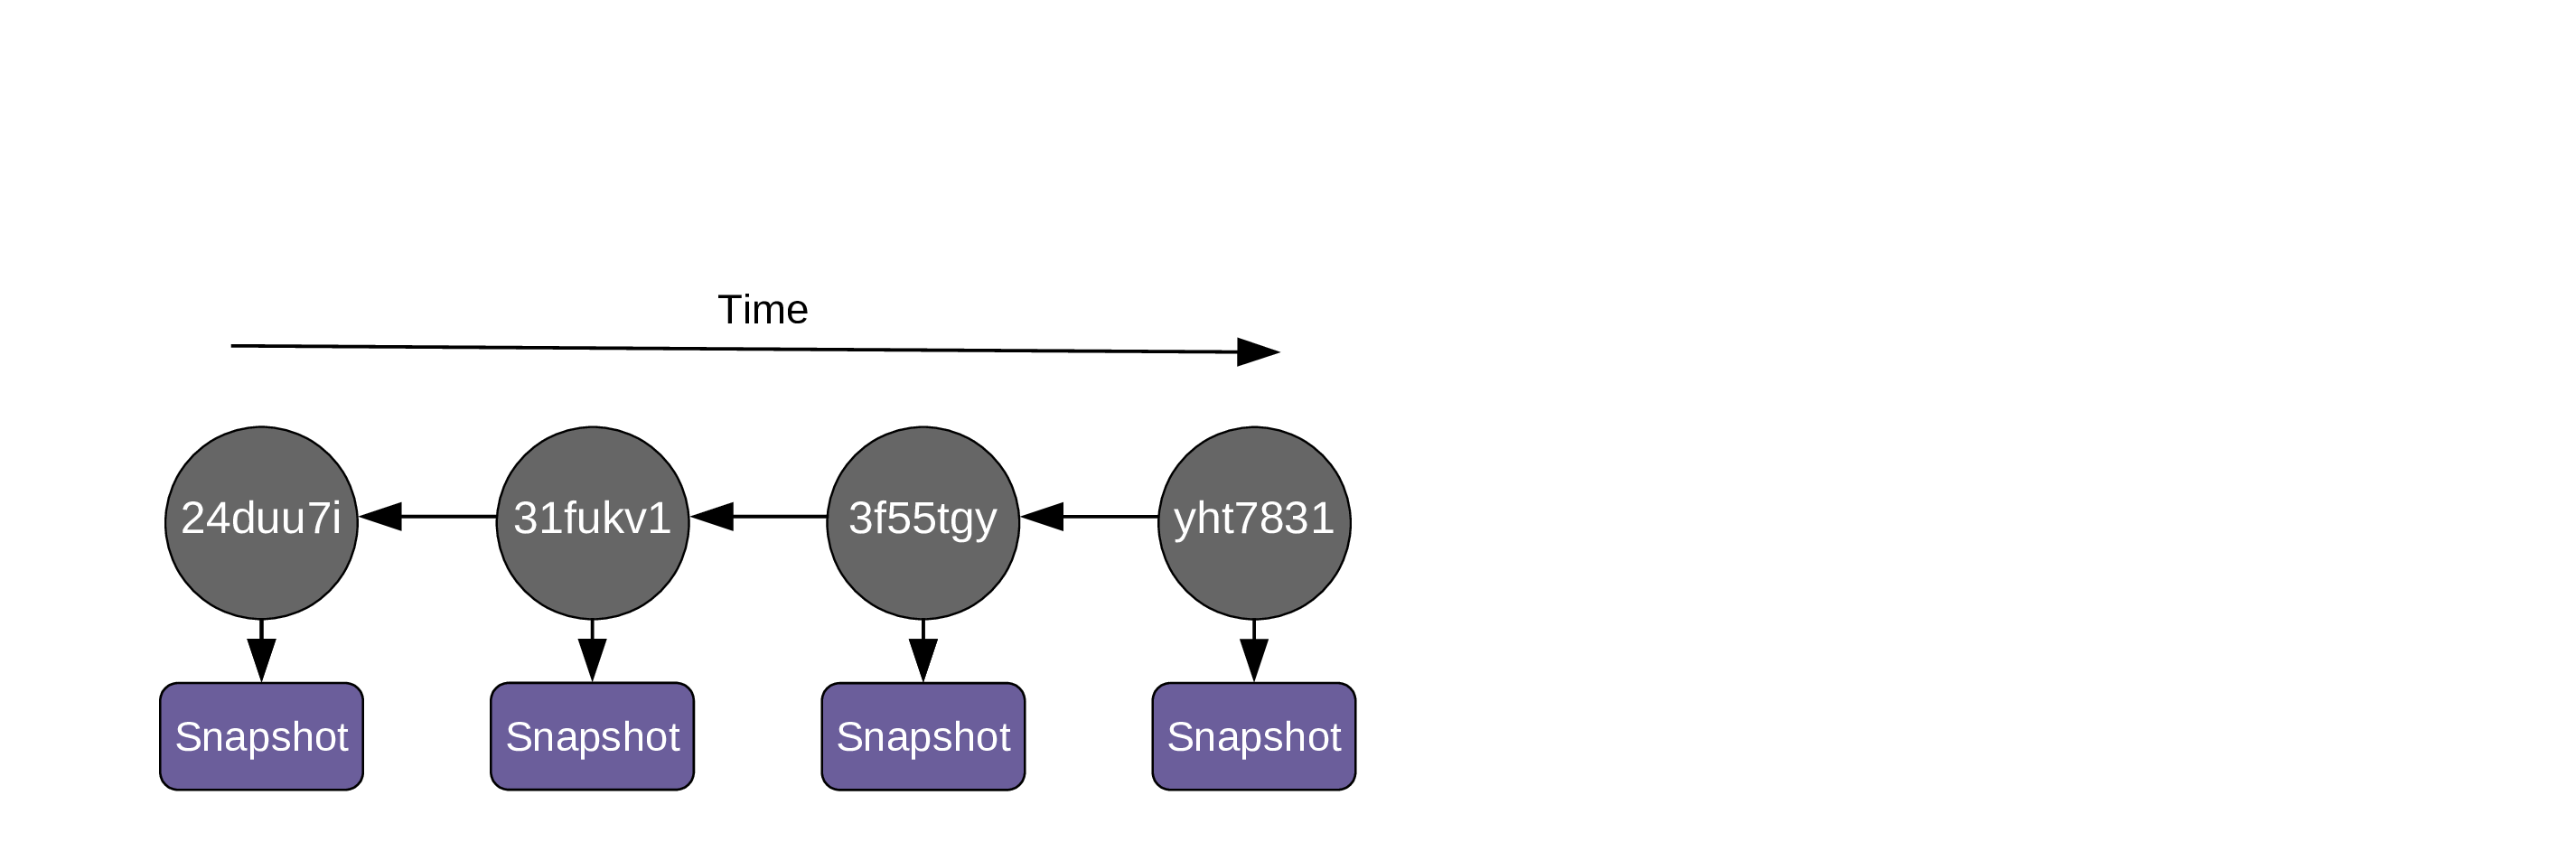
Snapshots metadata
Now, for these snapshots to be of any use, we need a system and some metadata to organize and access them.
Whenever you record a snapshot, a Git object pointing at this snapshot and called a commit is created. Each commit is identified by a unique 40-character checksum SHA-1 often simply referred to as a "hash".
Example of a Git hash: 1f5eaef51fcef3f3410dfe8696ff924b10d25b31
We usually only use the first 7 characters of the hash, which is always enough to identify it:
In the example above: 1f5eaef
Each commit contains the following metadata:
- the author of the snapshot,
- the date and time at which the snapshot was taken,
- the hash of its parent commit(s) so that Git can keep track of where it fits in the project history relative to other commits,
- a commit message.
The first three are generated automatically by Git. The commit message is a summary of the commit that you write for future you or for your collaborator and which will make it easier to identify this commit and what is in the snapshot it points to in the future.
Thanks to the commits, we don't have a messy list of versions, but an organized chronological history. Commits also allow us to identify, inspect, or retrieve specific versions of the project.
Since commits and snapshots are so closely associated, people often use the word "commit" to mean "the snapshot a commit is pointing to".
Pointers and more pointers
One of the things that make Git very powerful is that it is based on a system of very lightweight objects called pointers. These make many operations fast and efficient, but they can be a little confusing at first.
We already saw that a commit points to a snapshot.
Now, as soon as you create a Git repository, Git will create another pointer called a branch. By default, the first branch created is called main (it used to be called master until recently so you will see this a lot as well). You can rename it to whatever you want and it is not any different from any other branch you could create later on: they are all little pointers.
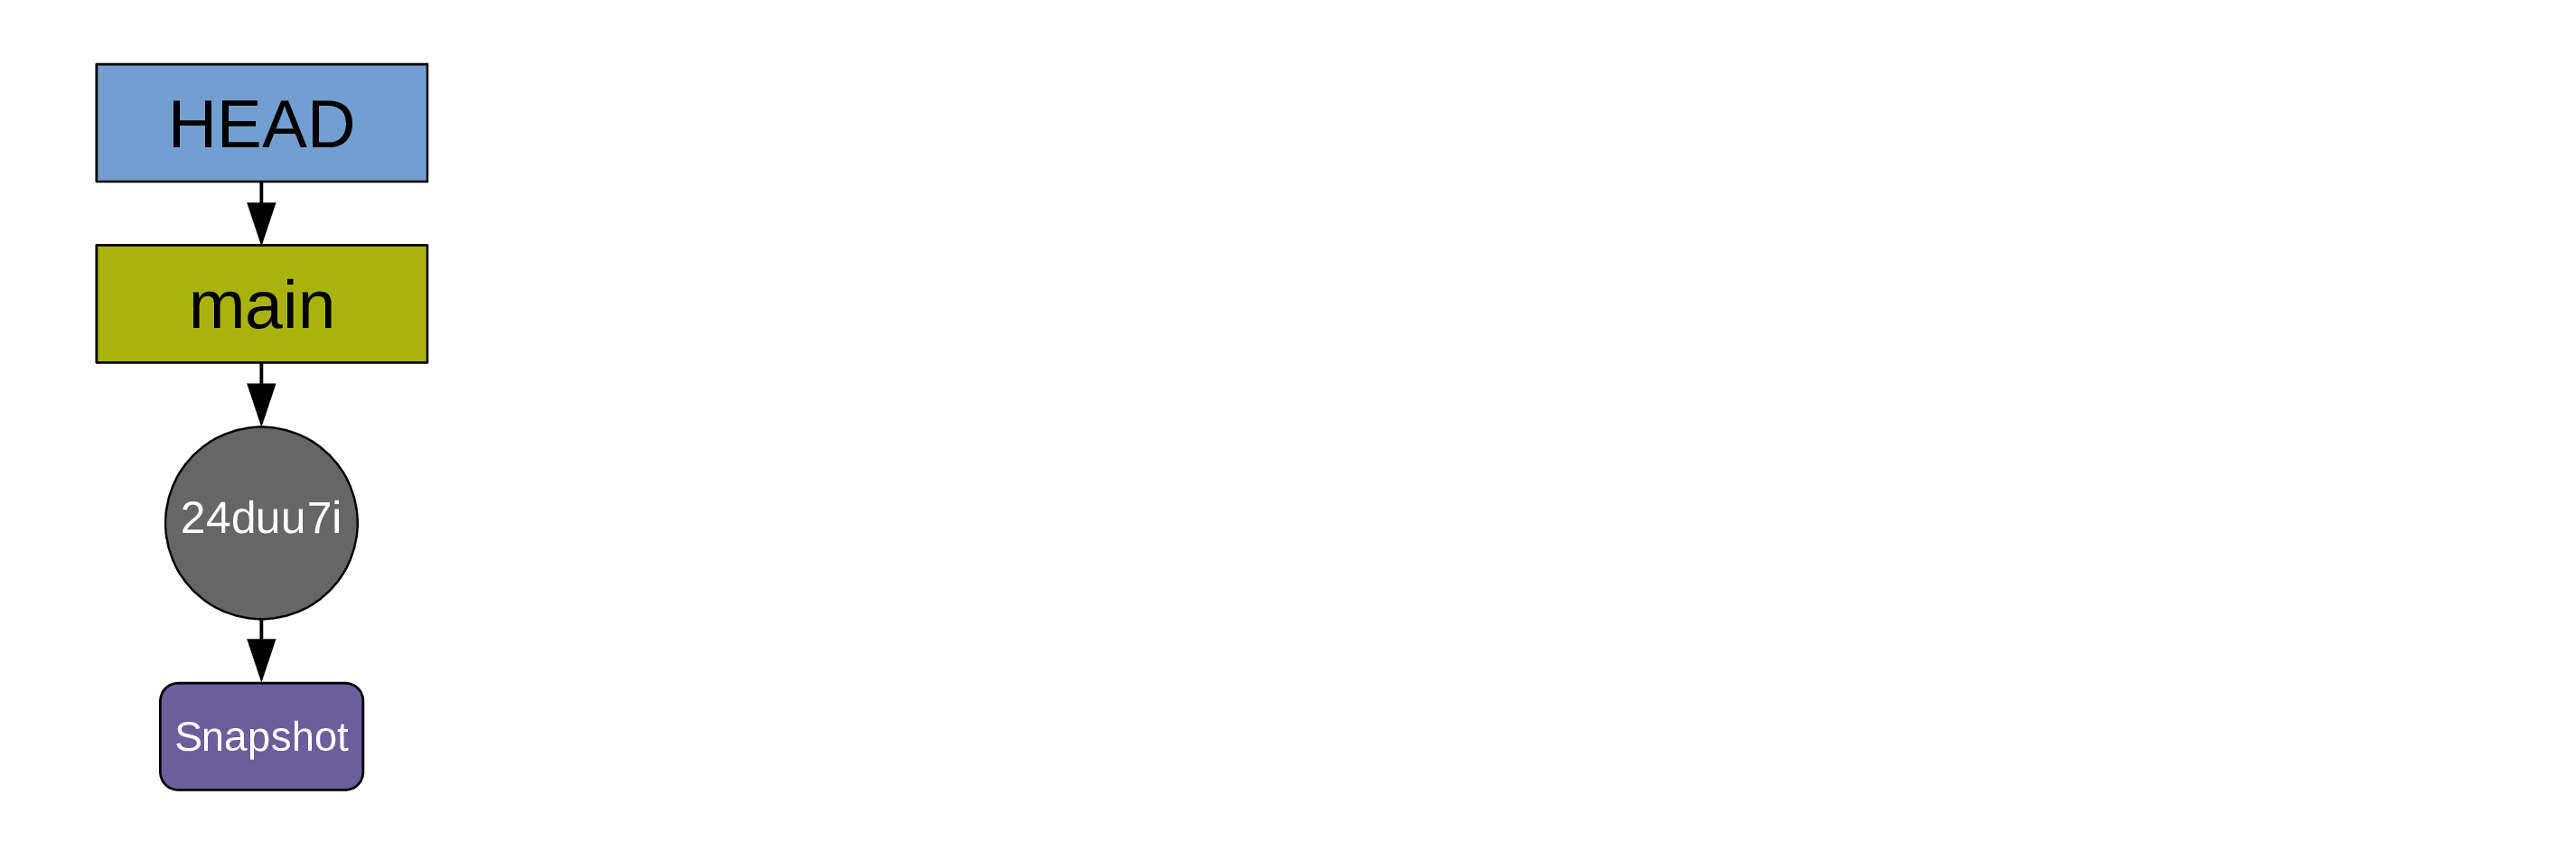
Finally, there is another pointer called HEAD which indicates where you currently are in the commit history.
As soon as you make your first commit, main points to that first commit and HEAD points to main:
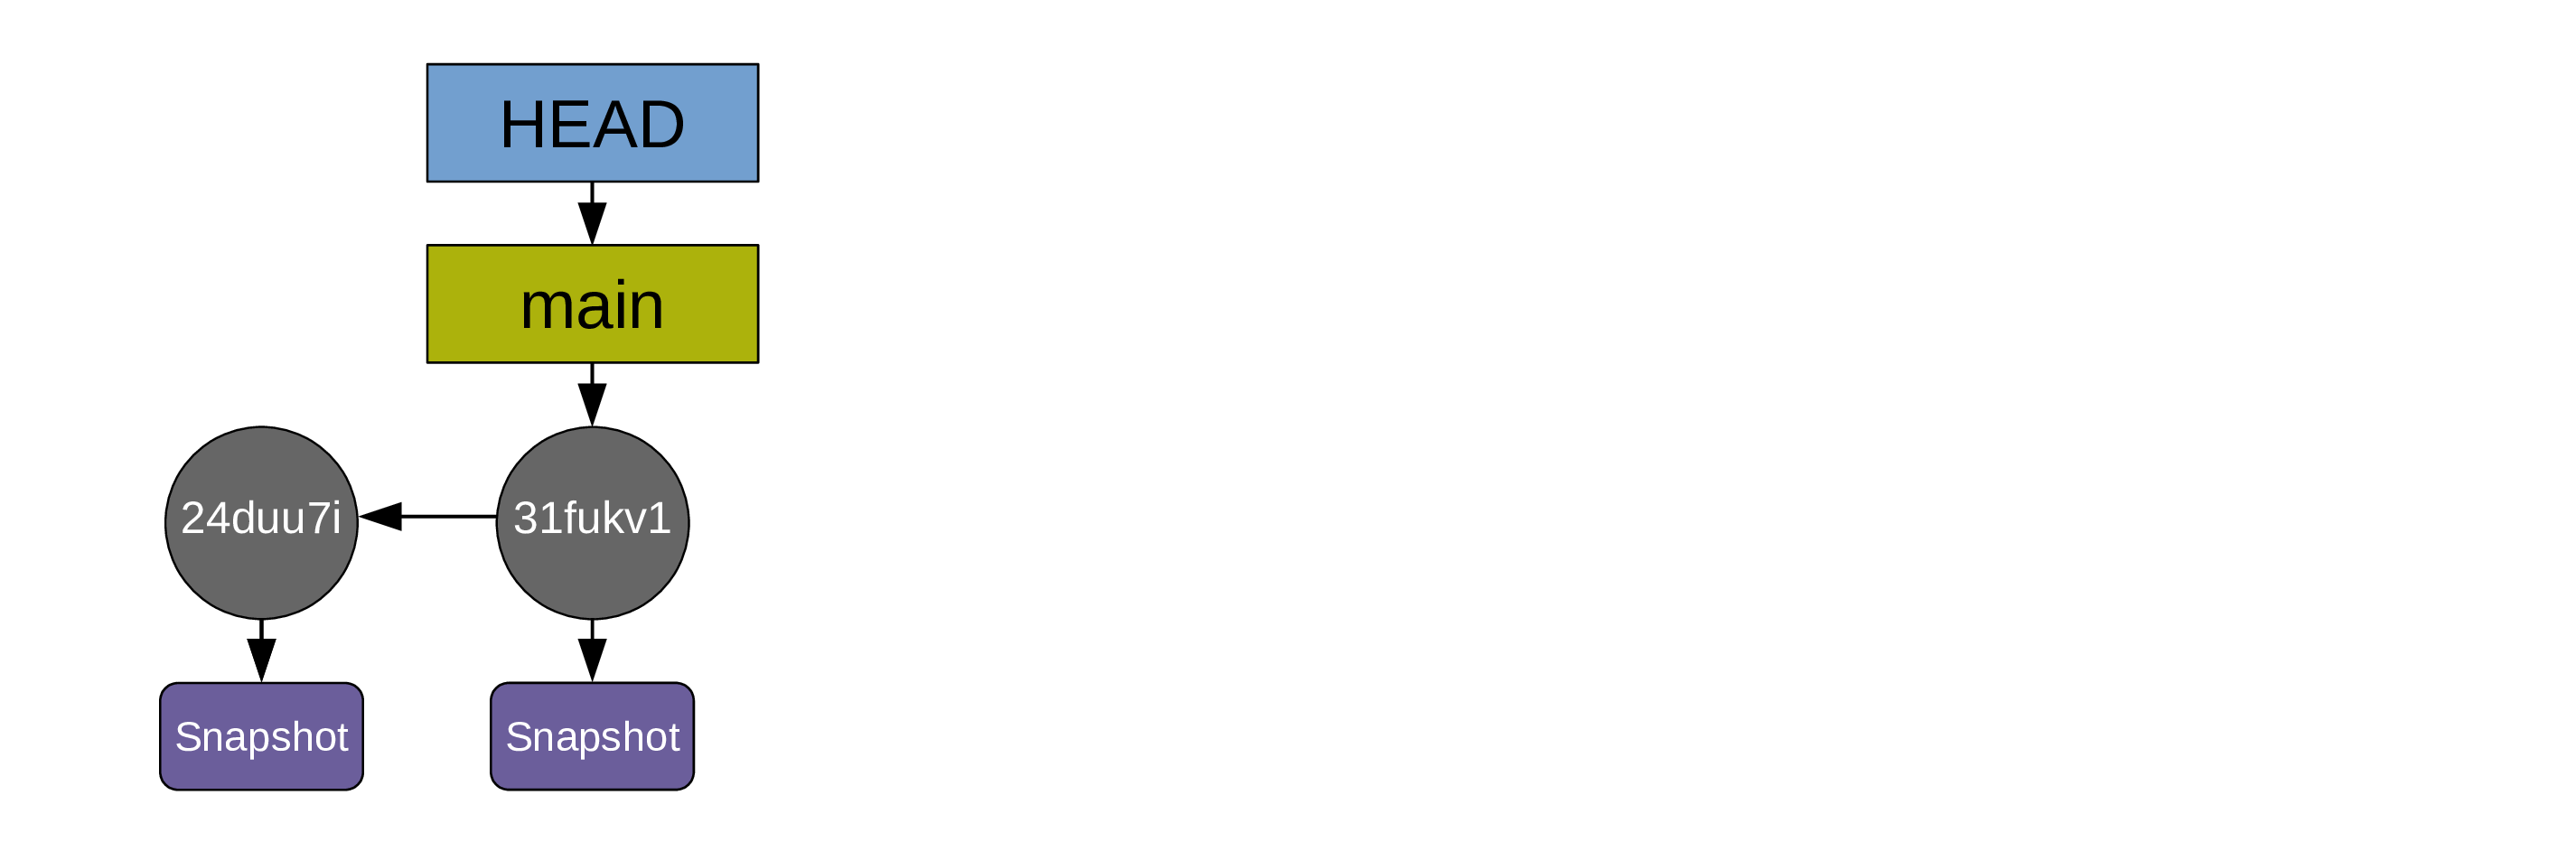
Each time you make a new commit,
- a new snapshot gets archived,
- a new commit (with a new unique hash) pointing to that snapshot gets created,
- the
mainbranch pointer andHEADmove to point to the new commit:
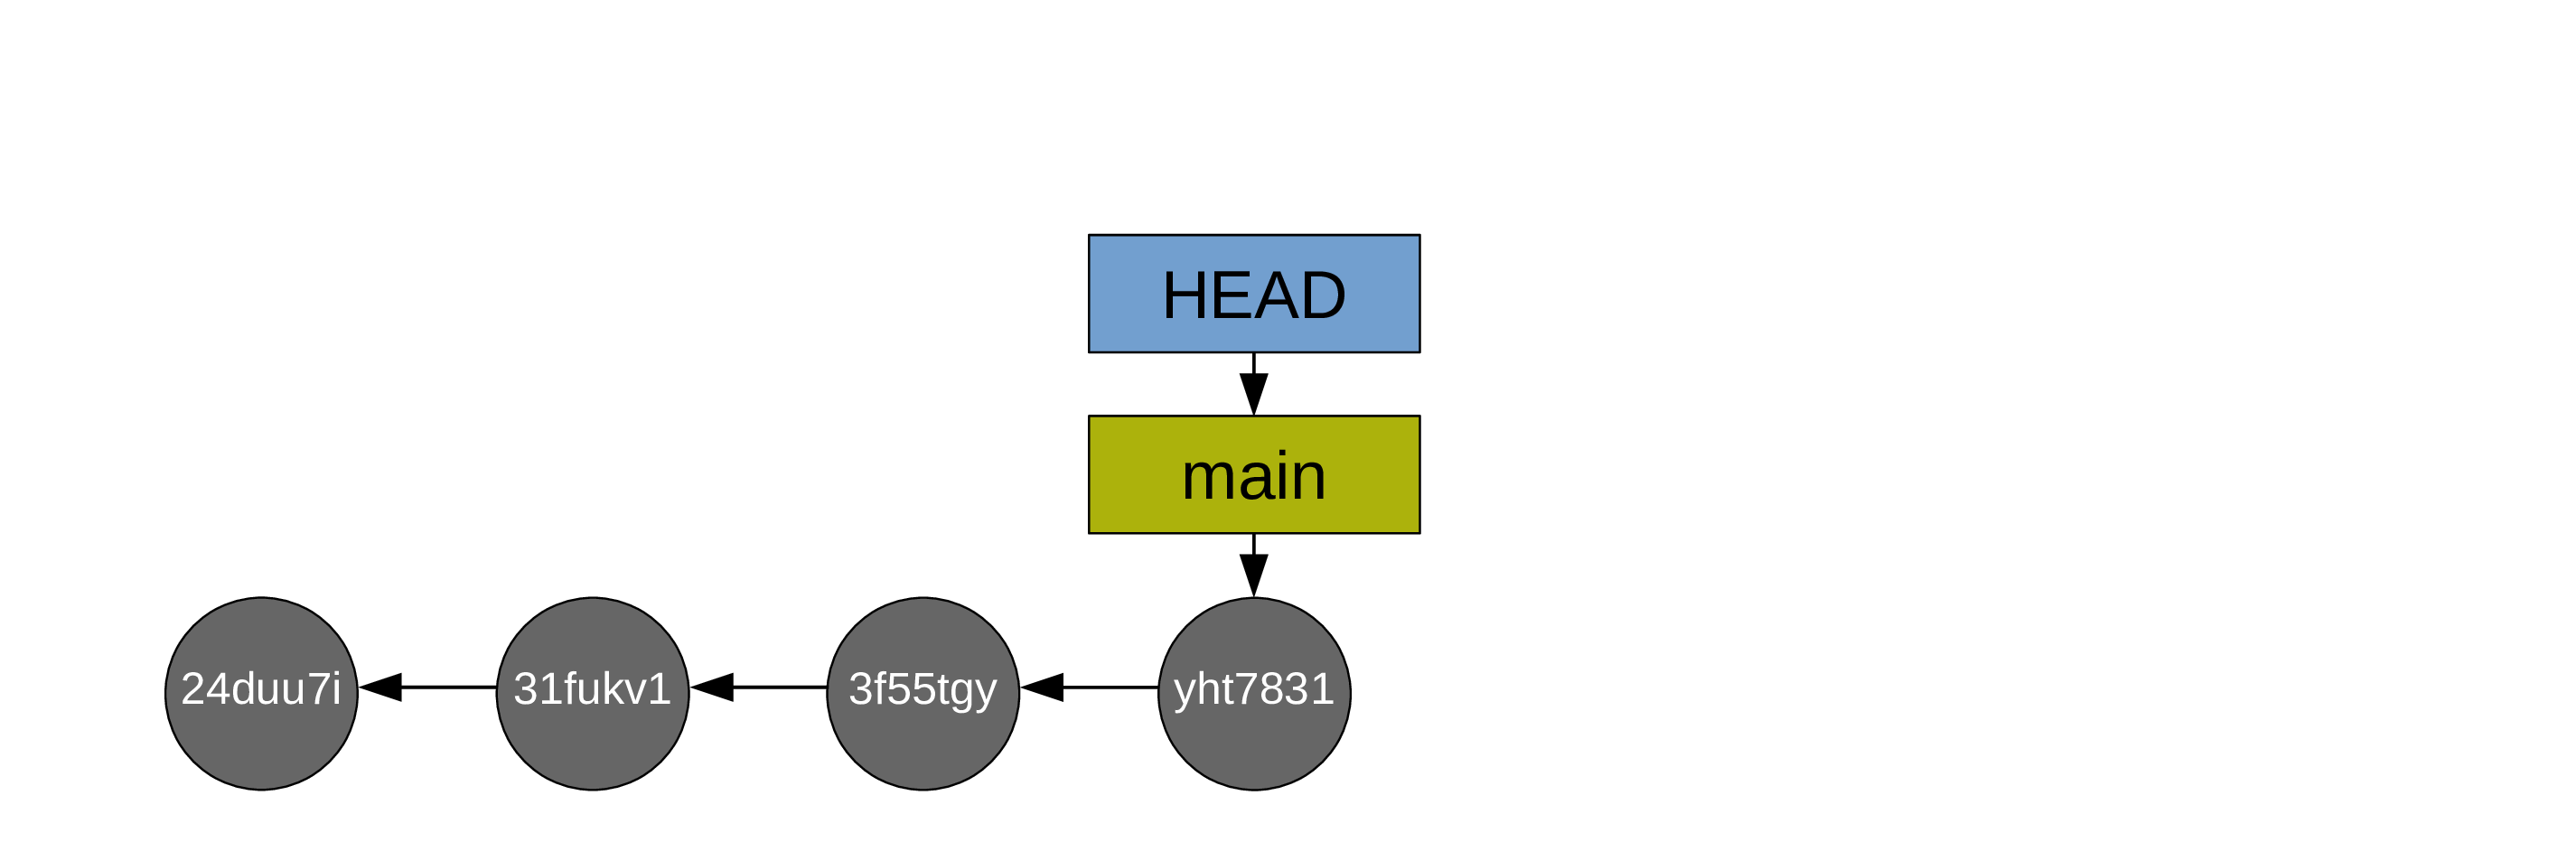
After another two commits, your history looks like this:
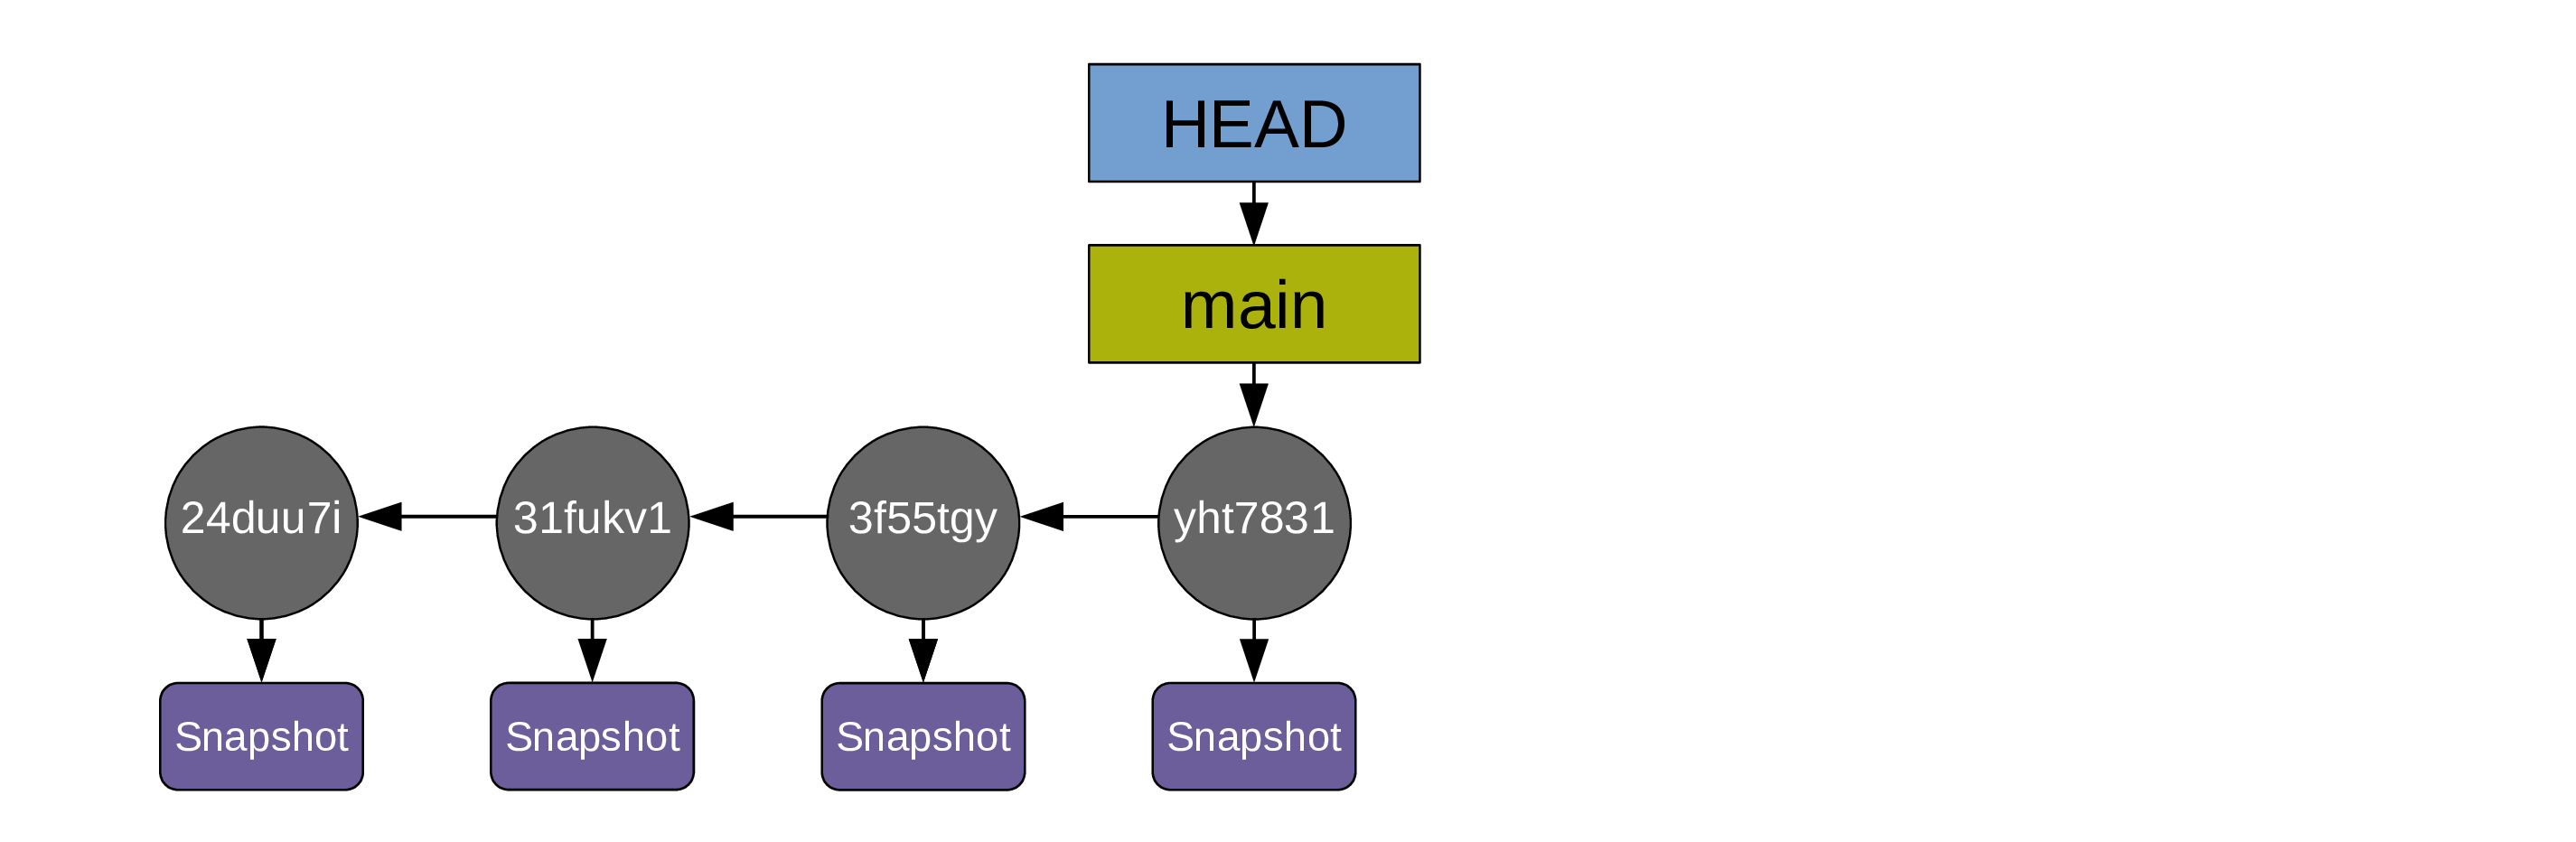
From now on, since every commit points to a snapshot, I will represent simplified graphs this way:
Displaying the commit history
These diagrams are nice, but how can we visualize them while we work on a project?
The command for this is: git log.
By default, this lists, in the pager less, the commits in the history of the branch HEAD is pointing to. For each commit, it gives its author, full hash, date and time, and message.
Reminder: useful keybindings when you are in less:
SPACE
scroll one screen down
b
scroll one screen up
q
quit
git log comes with many flags which allow countless variations. Here are few useful ones:
Log as a list
By default git log gives a lot of information for each commit. While this is sometimes useful, if you want to get a clear picture of your overall project history, it may be better to reduce each commit log to a one-liner:
git log --onelineYou can customize the commit log to your liking by playing with colors, time format, etc.
Try for instance:
git log \
    --graph \
    --date-order \
    --date=short \
    --pretty=format:'%C(cyan)%h %C(blue)%ar %C(auto)%d'`
                   `'%C(yellow)%s%+b %C(magenta)%ae'
To see all the available flags, run man git-log.
Log as a graph
The --graph flag allows to view this history in the form of a graph.
git log --graphLog of all branches
The --all flag shows all commits that are attached to the history, including those on other branches or "above" HEAD.
This may not make much sense yet, but it will this afternoon. It is an important flag to remember if you are ever wondering where some of your commits are when you run git log!
How does Git work?
Now, let's zoom in a bit and try to understand how these snapshots are created. This becomes a little bit more technical, but it is important to understand Git.
One useful mental representation of Git functioning is to imagine three file trees.
The three trees of Git
Working directory
Let's imagine that you are starting to work on a project.
First, you create a directory.
In it, you create several sub-directories.
In those, you create a number of files.
You can open these files, read them, edit them, etc. This is something you are very familiar with.
In the Git world, this is the
working directory
or
working tree
of the project.
That is: an uncompressed version of your files that you can access and edit.
You can think of it as a sandbox because this is where you can experiment with the project. This is where the project gets developed.
Now, Git has two other important pieces in its architecture.
Index
If you want the project history to be useful to future you, it has to be nice and tidy. You don't want to record snapshots haphazardly or you will never be able to find anything back.
Before you record a snapshot, you carefully select the elements of the project as it is now that would be useful to write to the project history together. The index or staging area is what allows to do that: it contains the suggested future snapshot.
HEAD
Finally, the last tree in Git architecture is one snapshot in the project history that serves as a reference version of the project: if you want to see what you have been experimenting on in your "sandbox", you need to compare the state of the working directory with some snapshot.
Remember that HEAD is a pointer pointing at a branch, that a branch is itself a pointer pointing at a commit, and finally that a commit is a Git object pointing at a snapshot. When the HEAD pointer moves around, whatever snapshot it points to populates the HEAD tree.
As we saw earlier, when you create a commit, HEAD automatically points to the new commit. So the HEAD tree is often filled with the last snapshot you created. But—as we will see later—we can move the HEAD pointer around through other ways. So the HEAD tree can be populated by any snapshot in your project history.
Status of the three trees
To display the status of these trees, you run:
git statusWorkflow
Let's see what happens as you work on a project under version control with Git.
After you have created a snapshot, the three trees are in the same state (we say that the working tree is "clean").
Here is an example for a project with a single file called File after the first snapshot was created. Let's say that it is at version v1:

Making changes to the working tree
When you edit files in your project, you make changes in the working directory or working tree.
For instance, you make a change to File. Let's say that it is now at version v2:
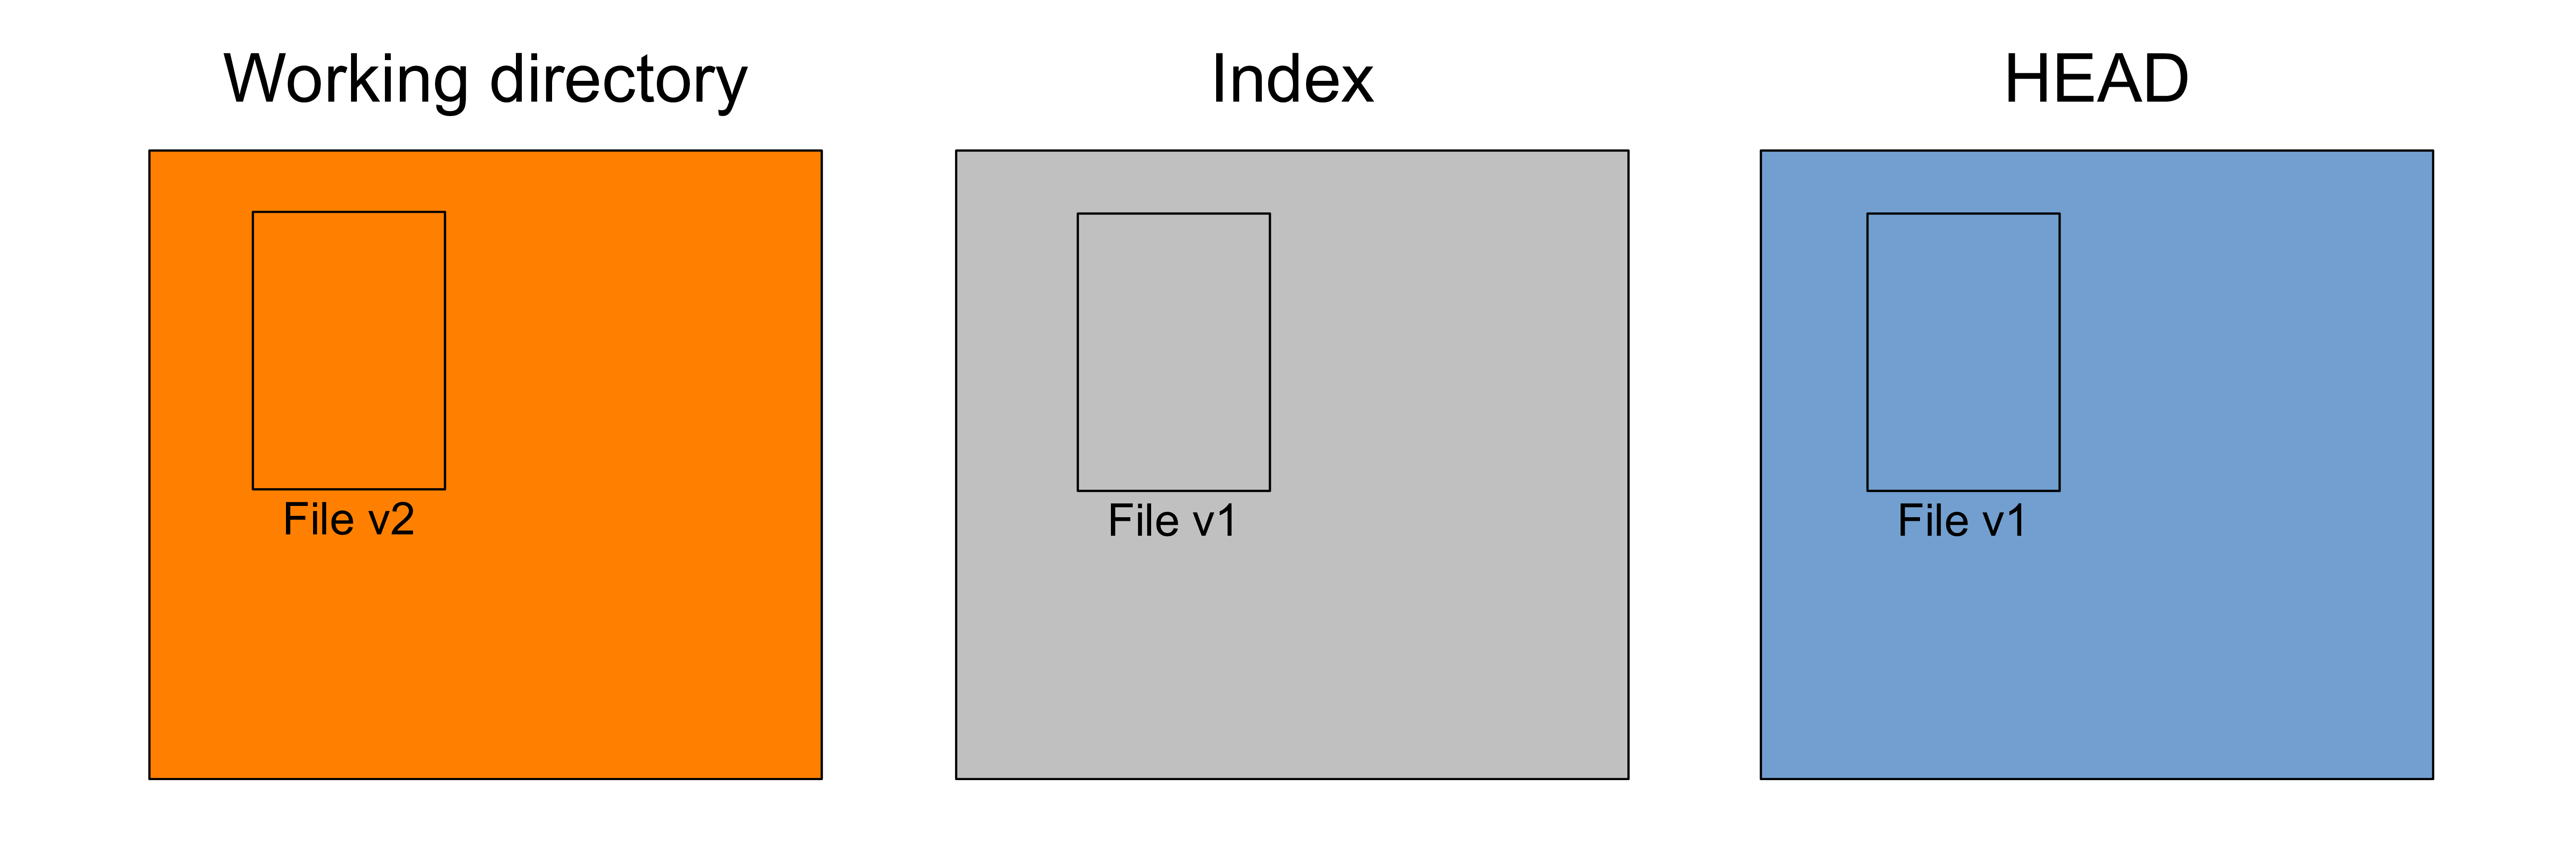
The other two trees remain at version v1.
If you run git status, this is what you get:
On branch main
Changes not staged for commit:
  (use "git add <file>..." to update what will be committed)
  (use "git restore <file>..." to discard changes in working directory)
        modified:   File

no changes added to commit (use "git add" and/or "git commit -a")
Staging changes
You stage that file (meaning that you will include the changes of that file in the next snapshot) with:
git add FileAfter which, your Git trees look like this:

Now, the index also has File at version v2 and git status returns:
On branch main
Changes to be committed:
  (use "git restore --staged <file>..." to unstage)
        modified:   File
Committing changes
Finally, you create a snapshot and the commit pointing to it—recording the staged changes to history—with:
git commit -m "Added File"
-m is a flag that allows to provide the commit message directly in the command line. If you don't use it, Git will open a text editor so that you can type the message. Without a message, there can be no commit.
Now your trees look like this:

We are back where we were at the start of this section, except that we have created an additional snapshot.
Our working tree is clean again and git status returns:
On branch main
nothing to commit, working tree clean
This means that there are no uncommitted changes in the working tree or the staging area: all the changes have been written to history.
Note that you don't have to stage all the changes in the working directory before making a commit; that is actually the whole point of the staging area (see below).
This means that the working directory is not necessarily clean after you have created a new commit.
Why a two-stage process?
Why do we first need to stage before we can commit? This allows you to pick and choose the changes that you want to include in a commit.
As a result, instead of having a messy bag of all your current changes whenever you write a commit, you can select changes that constitute a coherent unit and commit them together, leaving unrelated changes to be committed later.
This allows for a clearer history that will be much more useful in the future.
Example scenario:
You are working on a paper.
While writing the introduction of the manuscript, you realize that you made a mistake in your code and fix it. This leads to changes in the result section that you had already written and committed.
At the end of all this, without this two-stage process, you would have to create a commit with totally unrelated changes.
With this system, you can stage the correction of your code and of the result section of the manuscript and create a meaningful commit with only those ("Fix error caused by …"). Then, separately, you can stage and commit the introduction ("Add first draft of introduction").
We don't work in perfectly linear and organized fashion: we tend to jump from one thing to another. To make it a lot easier when we will need to revisit our project history, it is better to create a history that is more organized that the real chronological history of our work events.
Comparing trees with one another
It is very useful to compare the different trees:
git diff can show the differences between any two of your three trees.
Let's imagine that our three trees look like this:
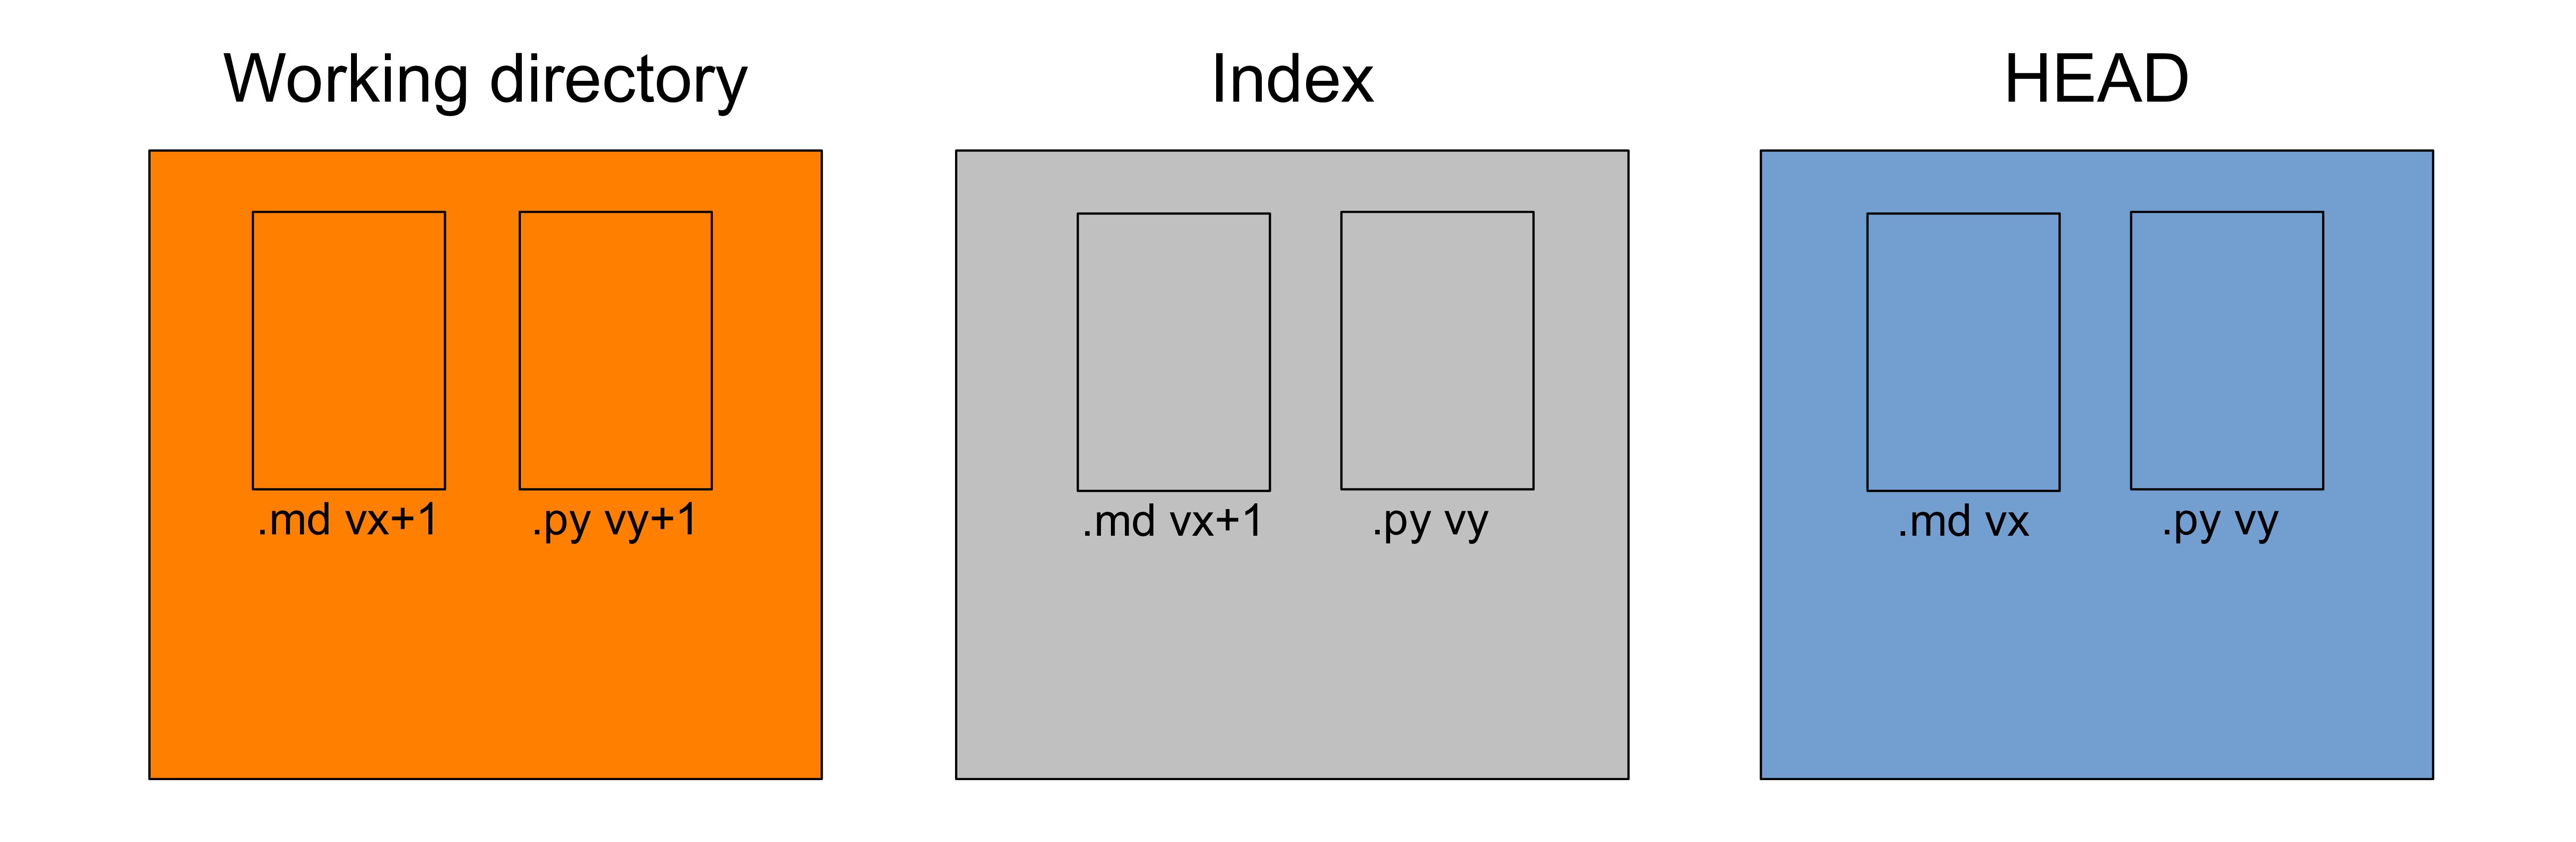
We have a markdown manuscript (symbolized by .md in the figure) and a Python script (symbolized by .py).
In our last commit, we saved a snapshot while they were at version vx and vy respectively. This is what HEAD shows (HEAD points to our last commit).
Then we made changes to the manuscript (so it is now at version vx+1 in the working directory) and we staged those changes (so .md is also at version vx+1 in the index).
Finally, we made changes to our script (which is thus now at version vy+1 in the working directory), but we did not stage those changes.
At this point, our three trees are all different from each other.
Difference between the working directory and the index
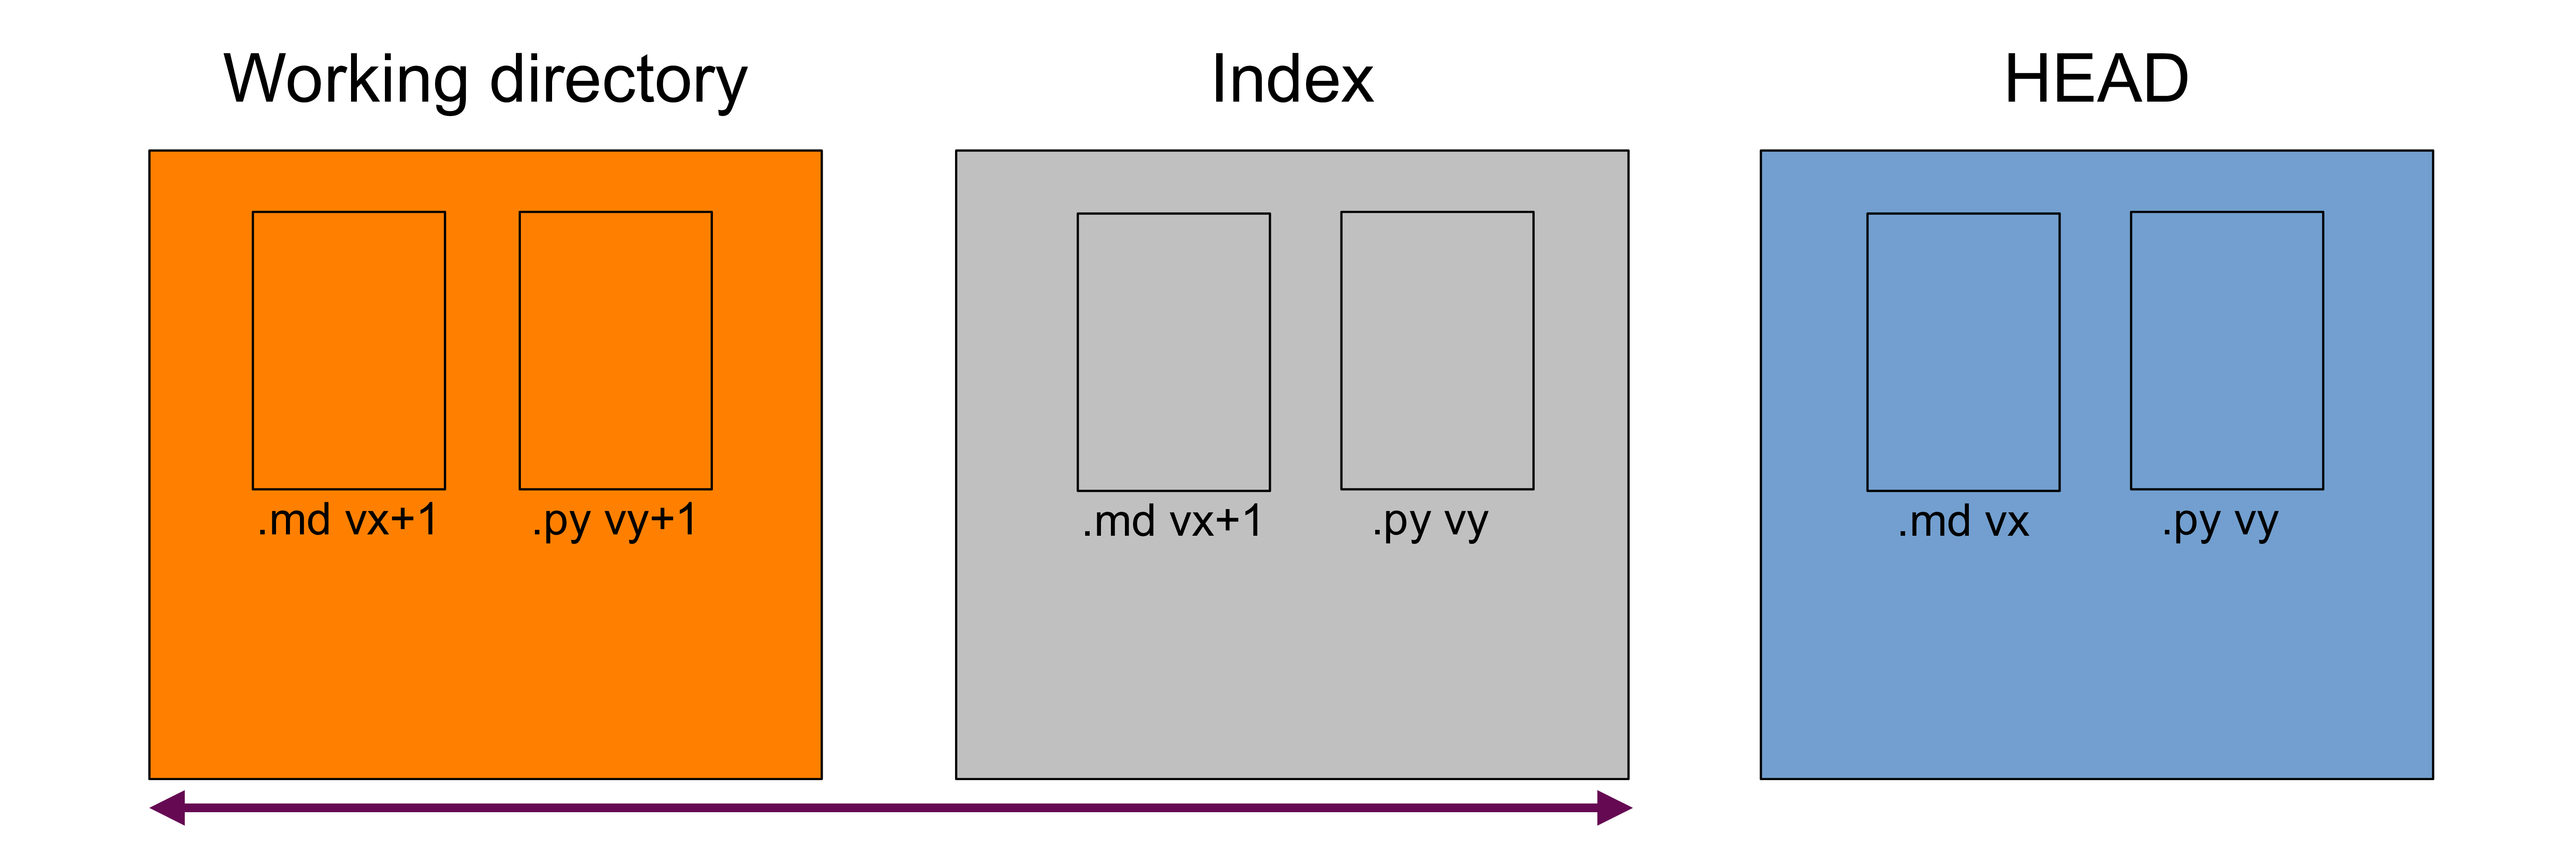
That's all your unstaged changes on tracked files (new files will not be shown)*.
You can get those differences with:
git diff
This will show you all the differences in the Python script between versions vy and vy+1.
*Git can detect new files you have never staged: it lists them in the output of git status. Until you put them under version control by staging them for the first time however, Git has no information about their content: at this point, they are untracked and they are not part of the working tree yet. So their content never appears in the output of git diff.
Difference between the index and your last commit
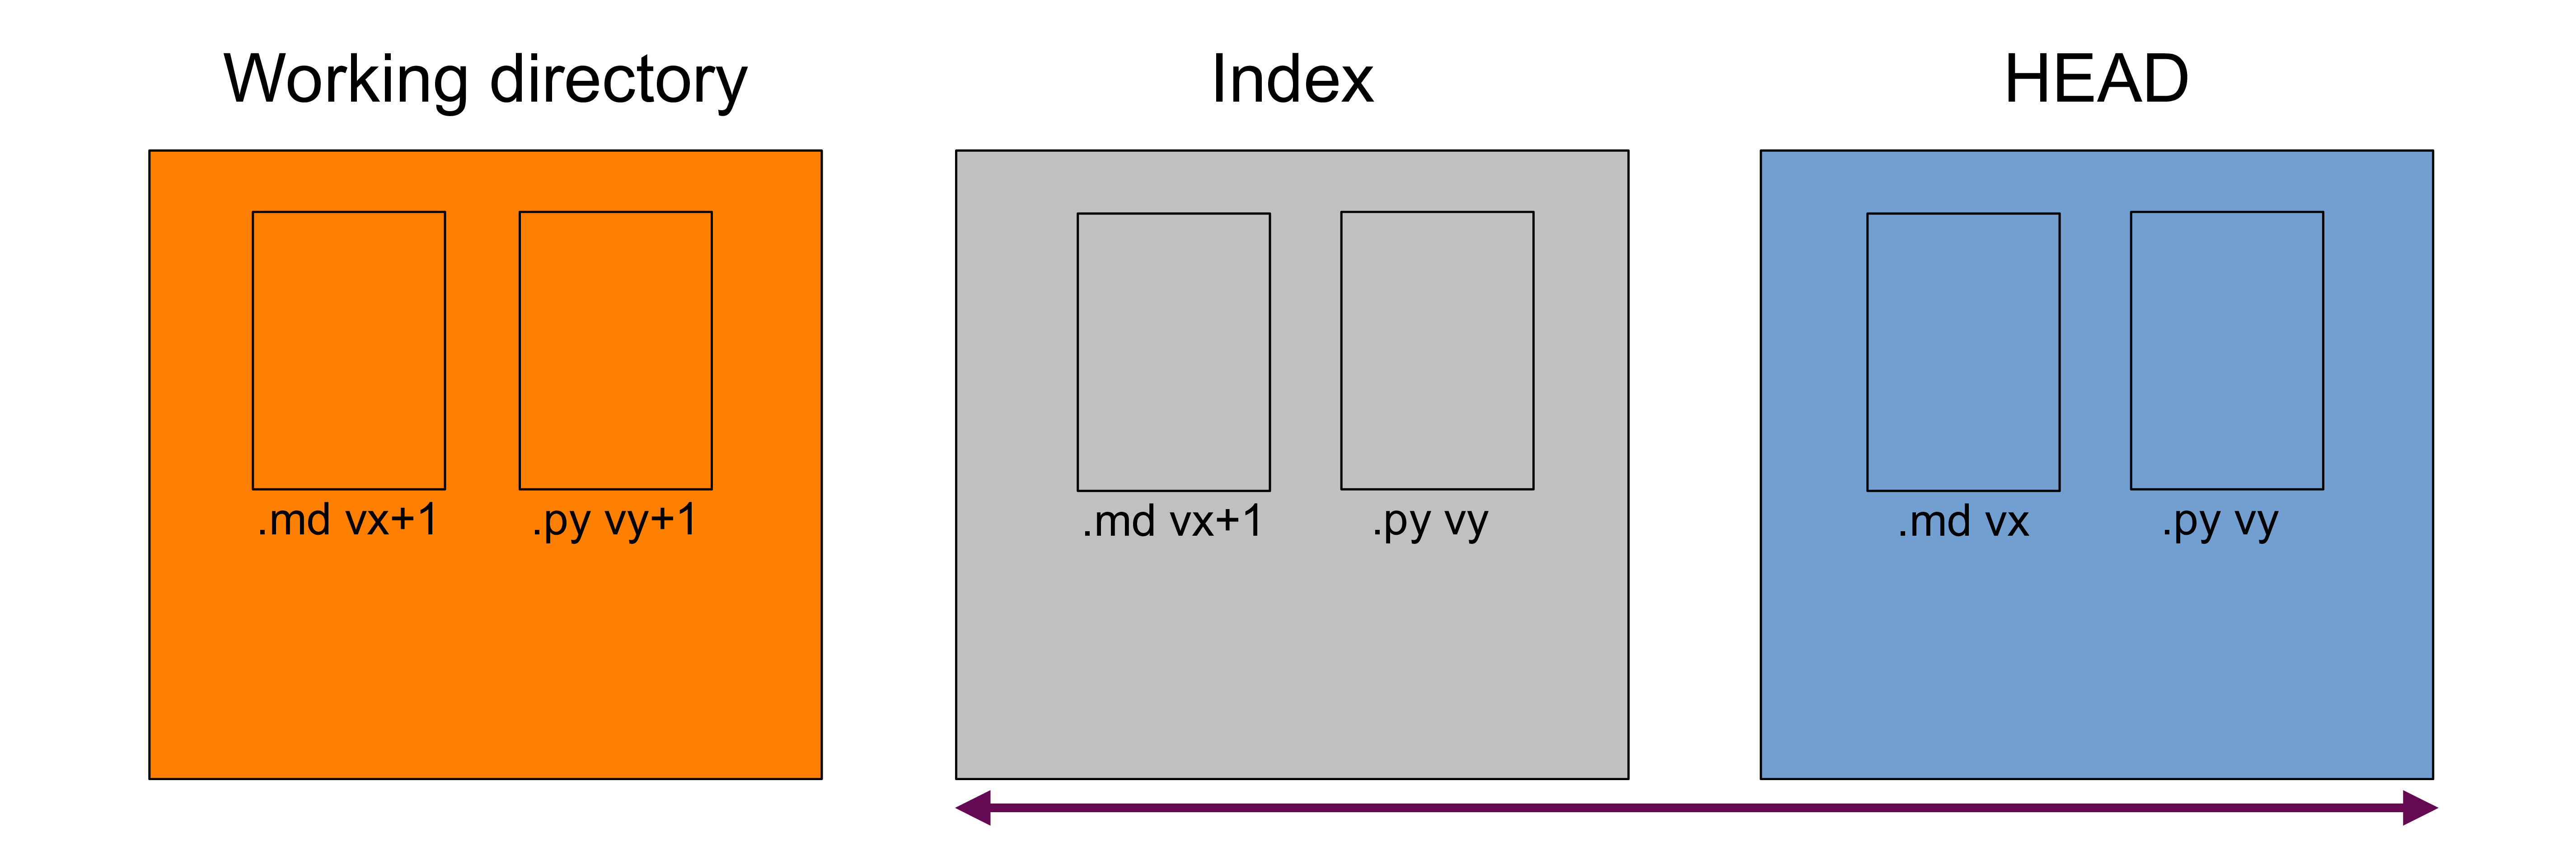
That's your staged changes ready to be committed. That is, that's what would be committed by git commit -m "Some message".
You get those differences with:
git diff --cached
This will show you all the differences in the markdown manuscript between versions vx and vx+1.
Difference between the working directory and your last commit
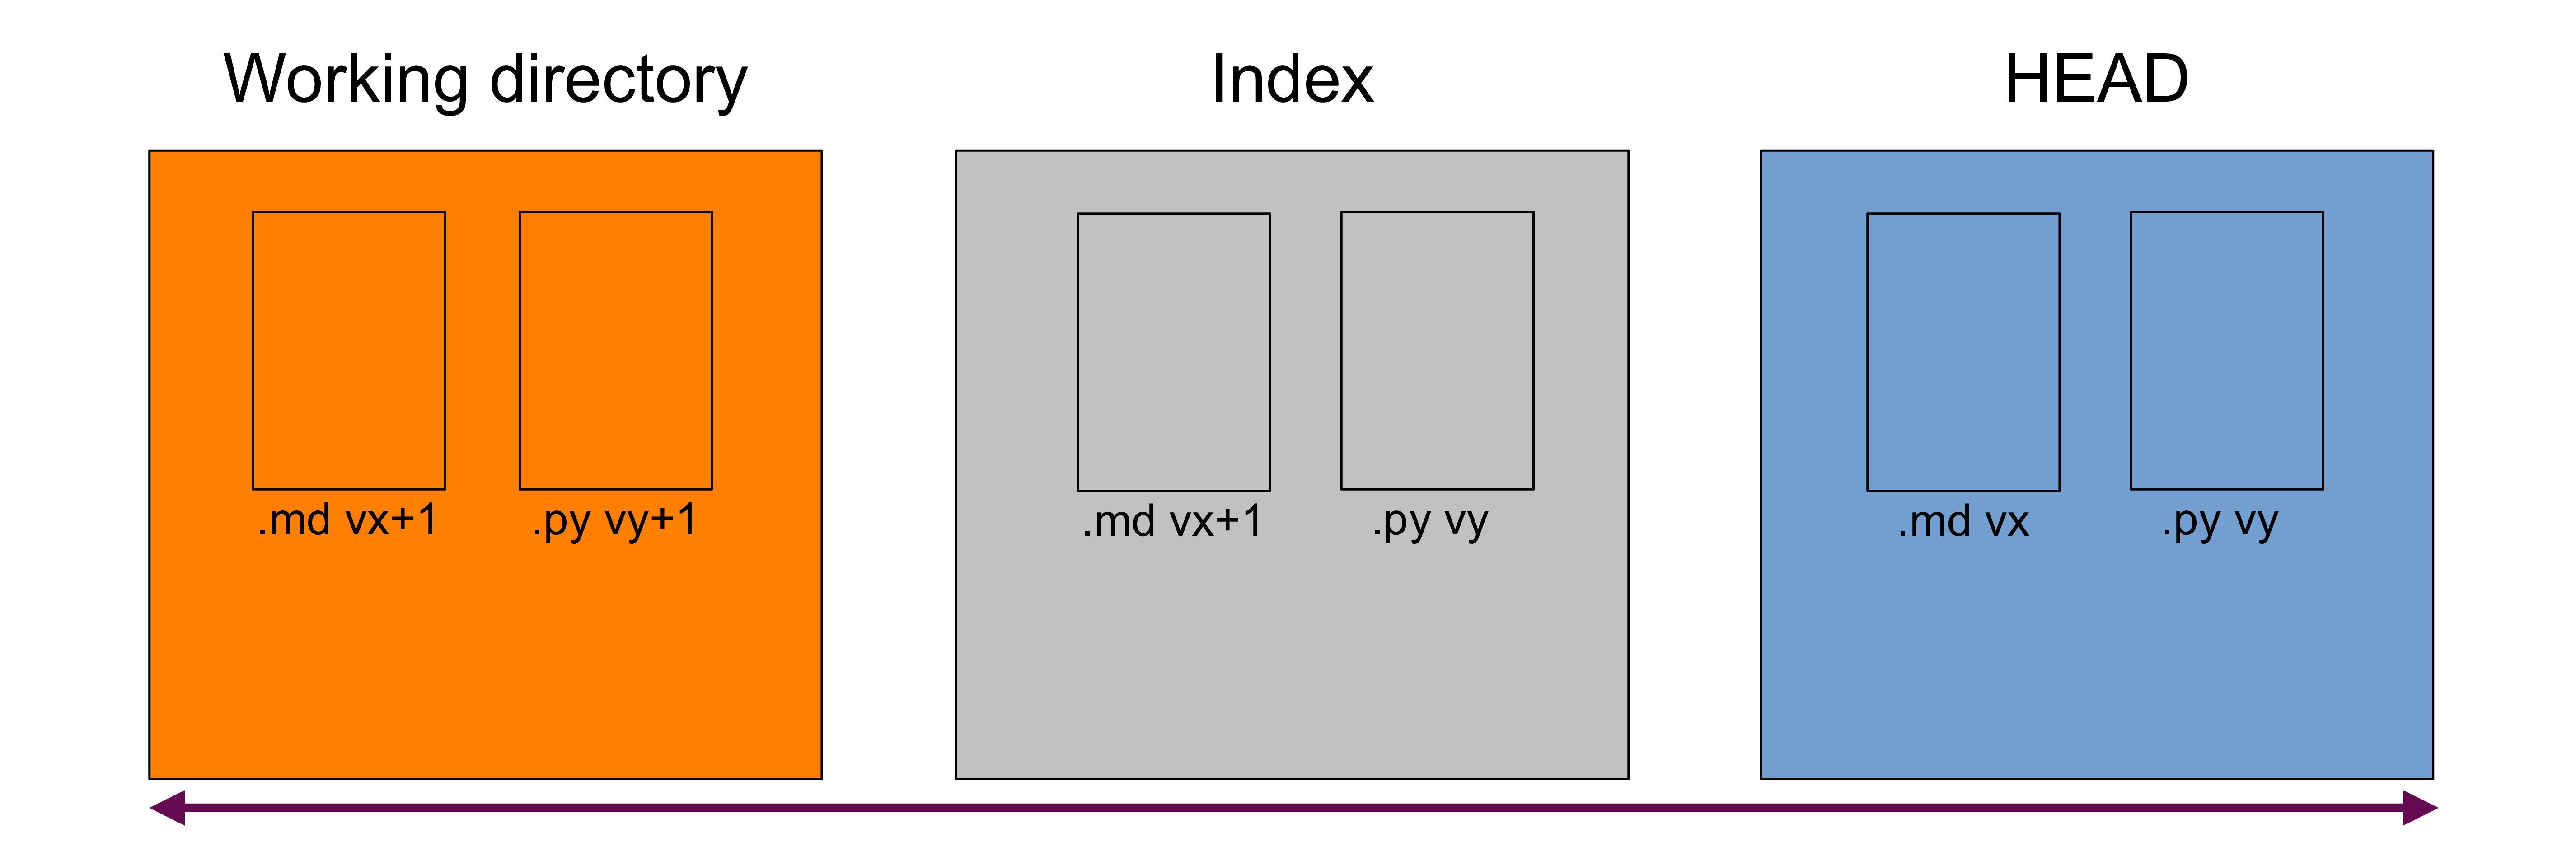
This is the combination of the previous two, that is, all your staged and unstaged changes (again, only on tracked files).
You can display those differences with:
git diff HEAD
This will show you the differences in the Python script between versions vy and vy+1 and in the markdown manuscript between versions vx and vx+1.
Getting information about Git objects
git show will show you more information about Git objects.
For instance:
git show <commit-hash>will show you all the commit information (hash, author, date, message) as well as the diff.